Where Are Open Univerity Tutorials Uploaded Where Are Open University Tutorials Uploaded
This browser is no longer supported.
Upgrade to Microsoft Border to take advantage of the latest features, security updates, and technical support.
Tutorial: Get Started with Entity Framework six Code First using MVC 5
Note
For new development, nosotros recommend ASP.Internet Core Razor Pages over ASP.NET MVC controllers and views. For a tutorial series similar to this 1 using Razor Pages, run across Tutorial: Go started with Razor Pages in ASP.NET Core. The new tutorial:
- Is easier to follow.
- Provides more EF Core all-time practices.
- Uses more efficient queries.
- Is more current with the latest API.
- Covers more than features.
- Is the preferred approach for new application development.
In this series of tutorials, you acquire how to build an ASP.NET MVC 5 application that uses Entity Framework 6 for data access. This tutorial uses the Lawmaking First workflow. For information almost how to choose between Lawmaking Starting time, Database First, and Model Starting time, see Create a model.
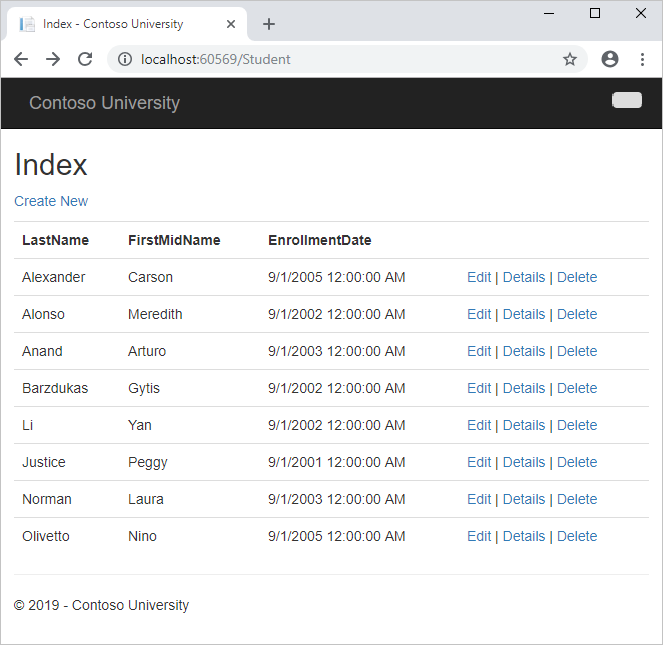
This tutorial serial explains how to build the Contoso University sample application. The sample application is a simple academy website. With it, you can view and update student, course, and instructor information. Here are 2 of the screens you create:

In this tutorial, you lot:
- Create an MVC web app
- Ready the site fashion
- Install Entity Framework 6
- Create the data model
- Create the database context
- Initialize DB with exam information
- Gear up EF 6 to use LocalDB
- Create controller and views
- View the database
Prerequisites
- Visual Studio 2017
Create an MVC web app
-
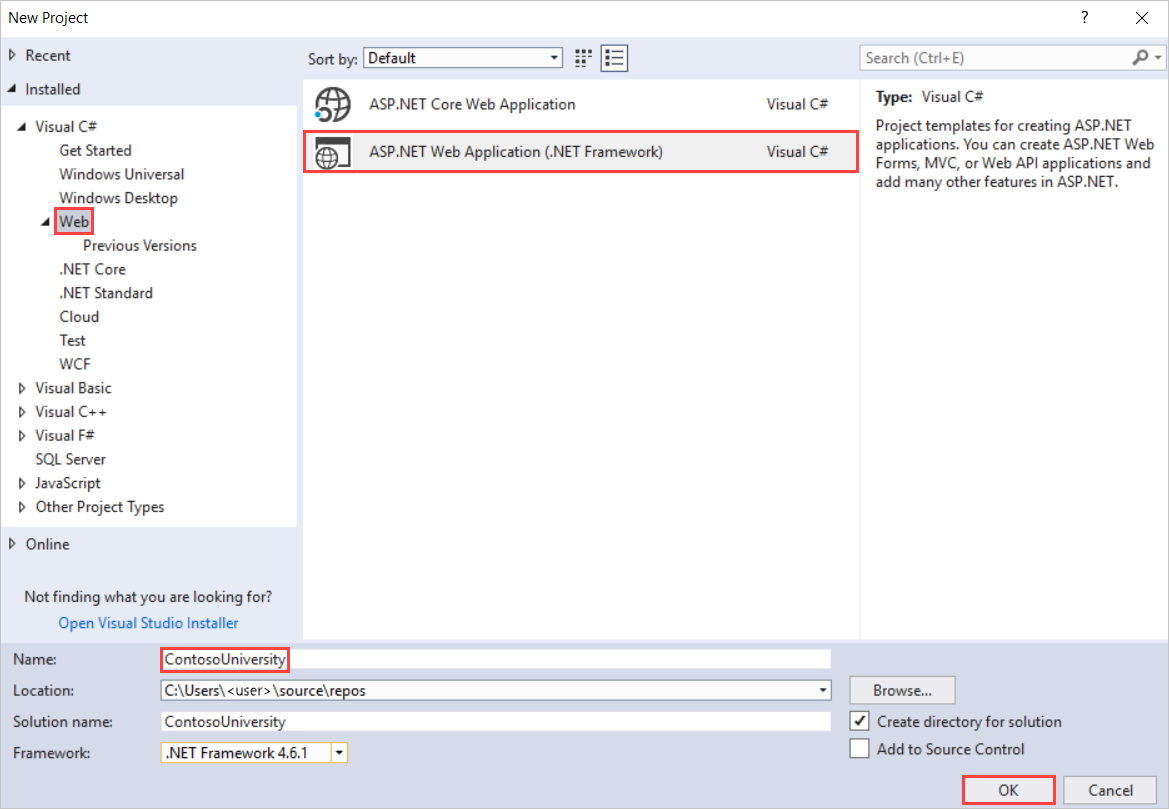
Open Visual Studio and create a C# web project using the ASP.Cyberspace Web Application (.Internet Framework) template. Proper name the project ContosoUniversity and select OK.
-
In New ASP.Cyberspace Web Application - ContosoUniversity, select MVC.

Note
By default, the Authentication option is gear up to No Authentication. For this tutorial, the spider web app doesn't require users to sign in. Besides, it doesn't restrict admission based on who'south signed in.
-
Select OK to create the project.
Fix the site manner
A few unproblematic changes volition fix up the site menu, layout, and home folio.
-
Open up Views\Shared\_Layout.cshtml, and brand the post-obit changes:
- Alter each occurrence of "My ASP.NET Awarding" and "Awarding name" to "Contoso Academy".
- Add menu entries for Students, Courses, Instructors, and Departments, and delete the Contact entry.
The changes are highlighted in the following code snippet:
<!DOCTYPE html> <html> <caput> <meta charset="utf-viii" /> <meta name="viewport" content="width=device-width, initial-scale=one.0"> <title>@ViewBag.Championship - Contoso University</title> @Styles.Render("~/Content/css") @Scripts.Render("~/bundles/modernizr") </head> <body> <div form="navbar navbar-inverse navbar-fixed-top"> <div form="navbar-inner"> <div class="container"> <push button type="button" grade="btn btn-navbar" data-toggle="plummet" data-target=".nav-collapse"> <span form="icon-bar"></bridge> <span class="icon-bar"></span> <span class="icon-bar"></span> </button> @Html.ActionLink("Contoso Academy", "Index", "Home", new { area = "" }, new { @form = "navbar-brand" }) <div class="nav-collapse collapse"> <ul class="nav"> <li>@Html.ActionLink("Abode", "Alphabetize", "Domicile")</li> <li>@Html.ActionLink("About", "Near", "Habitation")</li> <li>@Html.ActionLink("Students", "Index", "Student")</li> <li>@Html.ActionLink("Courses", "Alphabetize", "Course")</li> <li>@Html.ActionLink("Instructors", "Index", "Teacher")</li> <li>@Html.ActionLink("Departments", "Index", "Department")</li> </ul> </div> </div> </div> </div> <div class="container"> @RenderBody() <hr /> <footer> <p>© @DateTime.Now.Year - Contoso Academy</p> </footer> </div> @Scripts.Render("~/bundles/jquery") @Scripts.Render("~/bundles/bootstrap") @RenderSection("scripts", required: simulated) </body> </html> -
In Views\Home\Index.cshtml, supersede the contents of the file with the following code to replace the text nigh ASP.Internet and MVC with text about this application:
@{ ViewBag.Title = "Abode Page"; } <div class="jumbotron"> <h1>Contoso University</h1> </div> <div form="row"> <div class="col-doc-4"> <h2>Welcome to Contoso Academy</h2> <p>Contoso Academy is a sample application that demonstrates how to utilise Entity Framework 6 in an ASP.Cyberspace MVC 5 web application.</p> </div> <div class="col-md-iv"> <h2>Build information technology from scratch</h2> <p>You tin build the application by following the steps in the tutorial series on the ASP.Cyberspace site.</p> <p><a class="btn btn-default" href="http://www.asp.net/mvc/tutorials/getting-started-with-ef-using-mvc/">See the tutorial »</a></p> </div> <div class="col-md-4"> <h2>Download it</h2> <p>Yous can download the completed project.</p> <p><a class="btn btn-default" href="https://webpifeed.blob.cadre.windows.net/webpifeed/Partners/ASP.NET%20MVC%20Application%20Using%20Entity%20Framework%20Code%20First.zero">Download »</a></p> </div> </div> -
Press Ctrl+F5 to run the web site. You meet the domicile page with the main menu.
Install Entity Framework 6
-
From the Tools card, cull NuGet Packet Manager, and and then choose Package Manager Console.
-
In the Packet Director Console window, enter the following control:
Install-Package EntityFramework
This step is one of a few steps that this tutorial has you practise manually, but that could have been washed automatically past the ASP.NET MVC scaffolding feature. Yous're doing them manually so that you tin run into the steps required to use Entity Framework (EF). Y'all'll utilise scaffolding afterwards to create the MVC controller and views. An culling is to allow scaffolding automatically install the EF NuGet parcel, create the database context class, and create the connexion cord. When you're ready to do it that manner, all yous take to do is skip those steps and scaffold your MVC controller after y'all create your entity classes.
Create the data model
Adjacent you'll create entity classes for the Contoso University application. Y'all'll start with the following three entities:
Course <-> Enrollment <-> Pupil
| Entities | Relationship |
|---|---|
| Course to Enrollment | One-to-many |
| Student to Enrollment | 1-to-many |
There's a one-to-many relationship between Pupil and Enrollment entities, and there's a one-to-many human relationship between Course and Enrollment entities. In other words, a student can be enrolled in any number of courses, and a course tin have any number of students enrolled in it.
In the post-obit sections, yous'll create a form for each ane of these entities.
Notation
If y'all try to compile the projection before you finish creating all of these entity classes, y'all'll get compiler errors.
The Student entity
-
In the Models folder, create a course file named Educatee.cs by right-clicking on the folder in Solution Explorer and choosing Add > Course. Replace the template code with the following code:
using System; using System.Collections.Generic; namespace ContosoUniversity.Models { public grade Student { public int ID { get; set; } public string LastName { get; set up; } public string FirstMidName { get; ready; } public DateTime EnrollmentDate { get; set; } public virtual ICollection<Enrollment> Enrollments { get; set; } } }
The ID property volition go the primary fundamental column of the database table that corresponds to this class. By default, Entity Framework interprets a property that'due south named ID or classname ID as the principal key.
The Enrollments belongings is a navigation property. Navigation properties hold other entities that are related to this entity. In this case, the Enrollments holding of a Student entity will hold all of the Enrollment entities that are related to that Student entity. In other words, if a given Student row in the database has ii related Enrollment rows (rows that contain that student'southward main fundamental value in their StudentID foreign cardinal column), that Student entity's Enrollments navigation belongings volition contain those two Enrollment entities.
Navigation properties are typically defined as virtual so that they can have advantage of certain Entity Framework functionality such as lazy loading. (Lazy loading will exist explained later, in the Reading Related Information tutorial subsequently in this series.)
If a navigation property can hold multiple entities (as in many-to-many or one-to-many relationships), its type must be a listing in which entries can be added, deleted, and updated, such as ICollection.
The Enrollment entity
-
In the Models folder, create Enrollment.cs and replace the existing code with the following code:
namespace ContosoUniversity.Models { public enum Grade { A, B, C, D, F } public class Enrollment { public int EnrollmentID { get; set; } public int CourseID { get; set; } public int StudentID { get; set; } public Grade? Grade { become; ready; } public virtual Form Course { get; prepare; } public virtual Student Student { get; ready; } } }
The EnrollmentID belongings will be the primary key; this entity uses the classname ID design instead of ID by itself as you saw in the Educatee entity. Ordinarily y'all would choose i pattern and use it throughout your data model. Here, the variation illustrates that y'all can apply either blueprint. In a later on tutorial, yous'll see how using ID without classname makes it easier to implement inheritance in the information model.
The Grade property is an enum. The question marker after the Grade blazon declaration indicates that the Form belongings is nullable. A grade that's null is different from a zilch course — null ways a form isn't known or hasn't been assigned yet.
The StudentID belongings is a foreign central, and the corresponding navigation belongings is Student. An Enrollment entity is associated with 1 Student entity, so the property tin merely hold a unmarried Student entity (dissimilar the Student.Enrollments navigation property you saw before, which can hold multiple Enrollment entities).
The CourseID property is a foreign central, and the corresponding navigation property is Course. An Enrollment entity is associated with one Class entity.
Entity Framework interprets a property as a foreign key property if information technology's named <navigation property name><primary key belongings name> (for example, StudentID for the Student navigation property since the Student entity's primary fundamental is ID). Foreign key properties can also be named the same just <main key property proper noun> (for example, CourseID since the Course entity'due south primary key is CourseID).
The Course entity
-
In the Models folder, create Form.cs, replacing the template code with the post-obit code:
using System.Collections.Generic; using System.ComponentModel.DataAnnotations.Schema; namespace ContosoUniversity.Models { public class Course { [DatabaseGenerated(DatabaseGeneratedOption.None)] public int CourseID { get; set; } public string Title { get; gear up; } public int Credits { go; set; } public virtual ICollection<Enrollment> Enrollments { get; set; } } }
The Enrollments property is a navigation property. A Form entity can be related to any number of Enrollment entities.
We'll say more well-nigh the DatabaseGeneratedAttribute attribute in a afterwards tutorial in this series. Basically, this attribute lets you enter the primary key for the class rather than having the database generate it.
Create the database context
The master class that coordinates Entity Framework functionality for a given information model is the database context grade. You create this grade past deriving from the Organisation.Information.Entity.DbContext class. In your code, you specify which entities are included in the information model. You tin can also customize certain Entity Framework behavior. In this project, the class is named SchoolContext.
-
To create a folder in the ContosoUniversity project, right-click the projection in Solution Explorer and click Add, and then click New Binder. Name the new binder DAL (for Data Admission Layer). In that folder, create a new class file named SchoolContext.cs, and supervene upon the template code with the following code:
using ContosoUniversity.Models; using Organization.Data.Entity; using System.Information.Entity.ModelConfiguration.Conventions; namespace ContosoUniversity.DAL { public class SchoolContext : DbContext { public SchoolContext() : base("SchoolContext") { } public DbSet<Student> Students { become; prepare; } public DbSet<Enrollment> Enrollments { become; set; } public DbSet<Course> Courses { become; set; } protected override void OnModelCreating(DbModelBuilder modelBuilder) { modelBuilder.Conventions.Remove<PluralizingTableNameConvention>(); } } }
Specify entity sets
This code creates a DbSet property for each entity set. In Entity Framework terminology, an entity set typically corresponds to a database table, and an entity corresponds to a row in the table.
Note
You can omit the DbSet<Enrollment> and DbSet<Class> statements and it would work the same. Entity Framework would include them implicitly because the Student entity references the Enrollment entity and the Enrollment entity references the Grade entity.
Specify the connection string
The name of the connexion string (which you lot'll add to the Web.config file later) is passed in to the constructor.
public SchoolContext() : base("SchoolContext") { } You could likewise pass in the connection string itself instead of the name of one that is stored in the Spider web.config file. For more than data about options for specifying the database to use, see Connection strings and models.
If you don't specify a connection string or the name of ane explicitly, Entity Framework assumes that the connection string proper noun is the same as the grade name. The default connexion string name in this instance would then be SchoolContext, the same every bit what y'all're specifying explicitly.
Specify singular table names
The modelBuilder.Conventions.Remove statement in the OnModelCreating method prevents table names from beingness pluralized. If you didn't exercise this, the generated tables in the database would be named Students, Courses, and Enrollments. Instead, the table names will be Student, Course, and Enrollment. Developers disagree well-nigh whether table names should exist pluralized or non. This tutorial uses the atypical class, only the important point is that you tin select whichever form yous adopt by including or omitting this line of lawmaking.
Initialize DB with test data
Entity Framework can automatically create (or driblet and re-create) a database for you when the application runs. Y'all can specify that this should be done every time your awarding runs or but when the model is out of sync with the existing database. You can likewise write a Seed method that Entity Framework automatically calls after creating the database in order to populate information technology with test information.
The default beliefs is to create a database just if it doesn't exist (and throw an exception if the model has changed and the database already exists). In this section, yous'll specify that the database should exist dropped and re-created whenever the model changes. Dropping the database causes the loss of all your data. This is more often than not okay during development, because the Seed method volition run when the database is re-created and volition re-create your exam data. But in production you generally don't want to lose all your data every fourth dimension you lot need to change the database schema. Later yous'll see how to handle model changes by using Code Get-go Migrations to modify the database schema instead of dropping and re-creating the database.
-
In the DAL folder, create a new class file named SchoolInitializer.cs and replace the template code with the following code, which causes a database to be created when needed and loads test data into the new database.
using System; using Organization.Collections.Generic; using System.Linq; using Arrangement.Spider web; using System.Data.Entity; using ContosoUniversity.Models; namespace ContosoUniversity.DAL { public class SchoolInitializer : System.Data.Entity. DropCreateDatabaseIfModelChanges<SchoolContext> { protected override void Seed(SchoolContext context) { var students = new List<Educatee> { new Student{FirstMidName="Carson",LastName="Alexander",EnrollmentDate=DateTime.Parse("2005-09-01")}, new Student{FirstMidName="Meredith",LastName="Alonso",EnrollmentDate=DateTime.Parse("2002-09-01")}, new Educatee{FirstMidName="Arturo",LastName="Anand",EnrollmentDate=DateTime.Parse("2003-09-01")}, new Educatee{FirstMidName="Gytis",LastName="Barzdukas",EnrollmentDate=DateTime.Parse("2002-09-01")}, new Student{FirstMidName="Yan",LastName="Li",EnrollmentDate=DateTime.Parse("2002-09-01")}, new Student{FirstMidName="Peggy",LastName="Justice",EnrollmentDate=DateTime.Parse("2001-09-01")}, new Pupil{FirstMidName="Laura",LastName="Norman",EnrollmentDate=DateTime.Parse("2003-09-01")}, new Student{FirstMidName="Nino",LastName="Olivetto",EnrollmentDate=DateTime.Parse("2005-09-01")} }; students.ForEach(southward => context.Students.Add(s)); context.SaveChanges(); var courses = new Listing<Grade> { new Course{CourseID=1050,Championship="Chemistry",Credits=3,}, new Course{CourseID=4022,Title="Microeconomics",Credits=three,}, new Course{CourseID=4041,Title="Macroeconomics",Credits=3,}, new Course{CourseID=1045,Championship="Calculus",Credits=4,}, new Form{CourseID=3141,Championship="Trigonometry",Credits=4,}, new Course{CourseID=2021,Title="Composition",Credits=3,}, new Form{CourseID=2042,Title="Literature",Credits=4,} }; courses.ForEach(s => context.Courses.Add(s)); context.SaveChanges(); var enrollments = new Listing<Enrollment> { new Enrollment{StudentID=one,CourseID=1050,Course=Grade.A}, new Enrollment{StudentID=one,CourseID=4022,Grade=Grade.C}, new Enrollment{StudentID=i,CourseID=4041,Grade=Course.B}, new Enrollment{StudentID=two,CourseID=1045,Grade=Class.B}, new Enrollment{StudentID=2,CourseID=3141,Grade=Grade.F}, new Enrollment{StudentID=2,CourseID=2021,Grade=Grade.F}, new Enrollment{StudentID=3,CourseID=1050}, new Enrollment{StudentID=4,CourseID=1050,}, new Enrollment{StudentID=4,CourseID=4022,Grade=Class.F}, new Enrollment{StudentID=5,CourseID=4041,Form=Grade.C}, new Enrollment{StudentID=6,CourseID=1045}, new Enrollment{StudentID=7,CourseID=3141,Form=Course.A}, }; enrollments.ForEach(southward => context.Enrollments.Add(due south)); context.SaveChanges(); } } }The
Seedmethod takes the database context object as an input parameter, and the lawmaking in the method uses that object to add together new entities to the database. For each entity blazon, the code creates a drove of new entities, adds them to the appropriateDbSetproperty, so saves the changes to the database. It isn't necessary to phone call theSaveChangesmethod after each group of entities, as is done here, but doing that helps you locate the source of a trouble if an exception occurs while the code is writing to the database. -
To tell Entity Framework to use your initializer course, add an element to the
entityFrameworkelement in the application Web.config file (the i in the root projection folder), as shown in the following example:<entityFramework> <contexts> <context type="ContosoUniversity.DAL.SchoolContext, ContosoUniversity"> <databaseInitializer blazon="ContosoUniversity.DAL.SchoolInitializer, ContosoUniversity" /> </context> </contexts> <defaultConnectionFactory type="System.Information.Entity.Infrastructure.LocalDbConnectionFactory, EntityFramework"> <parameters> <parameter value="v11.0" /> </parameters> </defaultConnectionFactory> <providers> <provider invariantName="System.Information.SqlClient" blazon="System.Information.Entity.SqlServer.SqlProviderServices, EntityFramework.SqlServer" /> </providers> </entityFramework>The
context typespecifies the fully qualified context class name and the assembly it's in, and thedatabaseinitializer typespecifies the fully qualified name of the initializer class and the associates information technology'south in. (When you don't desire EF to employ the initializer, you can fix an attribute on thecontextelement:disableDatabaseInitialization="true".) For more information, run across Configuration File Settings.An alternative to setting the initializer in the Web.config file is to exercise it in code by adding a
Database.SetInitializerstatement to theApplication_Startmethod in the Global.asax.cs file. For more information, meet Agreement Database Initializers in Entity Framework Code First.
The application is at present set and then that when you access the database for the first time in a given run of the awarding, Entity Framework compares the database to the model (your SchoolContext and entity classes). If in that location's a difference, the application drops and re-creates the database.
Note
When you deploy an application to a production web server, you must remove or disable code that drops and re-creates the database. You'll do that in a later tutorial in this serial.
Ready EF 6 to use LocalDB
LocalDB is a lightweight version of the SQL Server Express database engine. It's easy to install and configure, starts on demand, and runs in user mode. LocalDB runs in a special execution mode of SQL Server Express that enables you to work with databases as .mdf files. Yous can put LocalDB database files in the App_Data folder of a web project if yous want to be able to re-create the database with the project. The user instance characteristic in SQL Server Express also enables you to piece of work with .mdf files, but the user example feature is deprecated; therefore, LocalDB is recommended for working with .mdf files. LocalDB is installed by default with Visual Studio.
Typically, SQL Server Limited is not used for production web applications. LocalDB in particular is non recommended for production use with a web application because it'southward not designed to work with IIS.
-
In this tutorial, you'll piece of work with LocalDB. Open the application Web.config file and add together a
connectionStringselement preceding theappSettingselement, as shown in the following case. (Make sure you update the Spider web.config file in the root projection folder. At that place's also a Spider web.config file in the Views subfolder that you don't need to update.)<connectionStrings> <add together proper noun="SchoolContext" connectionString="Information Source=(LocalDb)\MSSQLLocalDB;Initial Itemize=ContosoUniversity1;Integrated Security=SSPI;" providerName="Organization.Data.SqlClient"/> </connectionStrings> <appSettings> <add key="webpages:Version" value="iii.0.0.0" /> <add key="webpages:Enabled" value="false" /> <add fundamental="ClientValidationEnabled" value="true" /> <add key="UnobtrusiveJavaScriptEnabled" value="truthful" /> </appSettings>
The connection string yous've added specifies that Entity Framework will utilize a LocalDB database named ContosoUniversity1.mdf. (The database doesn't be yet merely EF will create information technology.) If you desire to create the database in your App_Data folder, you could add together AttachDBFilename=|DataDirectory|\ContosoUniversity1.mdf to the connection string. For more information about connection strings, see SQL Server Connection Strings for ASP.Net Web Applications.
Y'all don't actually demand a connexion string in the Web.config file. If you don't supply a connection string, Entity Framework uses a default connection cord based on your context form. For more information, run across Code Outset to a New Database.
Create controller and views
Now you'll create a web page to display data. The process of requesting the data automatically triggers the creation of the database. You'll begin by creating a new controller. But before you do that, build the projection to make the model and context classes bachelor to MVC controller scaffolding.
-
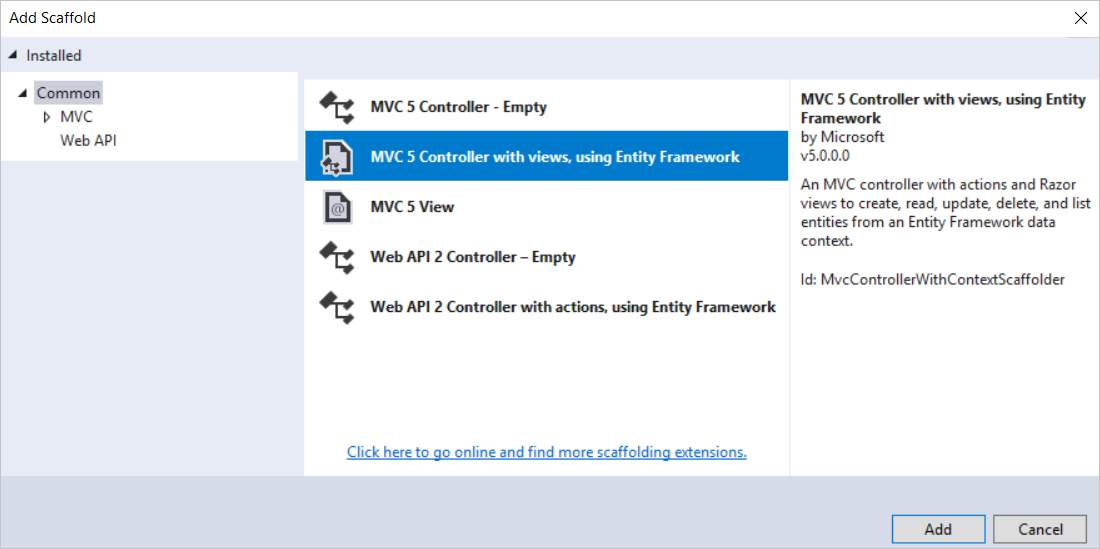
Right-click the Controllers folder in Solution Explorer, select Add, and so click New Scaffolded Detail.
-
In the Add Scaffold dialog box, select MVC 5 Controller with views, using Entity Framework, and then choose Add.
-
In the Add Controller dialog box, make the following selections, and then choose Add together:
-
Model form: Educatee (ContosoUniversity.Models). (If y'all don't run into this option in the drop-downward list, build the project and try again.)
-
Data context form: SchoolContext (ContosoUniversity.DAL).
-
Controller proper noun: StudentController (non StudentsController).
-
Leave the default values for the other fields.
When yous click Add together, the scaffolder creates a StudentController.cs file and a gear up of views (.cshtml files) that work with the controller. In the time to come when y'all create projects that use Entity Framework, you tin also have reward of some additional functionality of the scaffolder: create your get-go model class, don't create a connexion cord, then in the Add Controller box specify New information context by selecting the + push next to Data context class. The scaffolder will create your
DbContextclass and your connection string also equally the controller and views.
-
-
Visual Studio opens the Controllers\StudentController.cs file. You lot come across that a form variable has been created that instantiates a database context object:
private SchoolContext db = new SchoolContext();The
Indexactiveness method gets a listing of students from the Students entity set by reading theStudentsproperty of the database context instance:public ViewResult Index() { render View(db.Students.ToList()); }The Student\Alphabetize.cshtml view displays this list in a table:
<tabular array> <tr> <th> @Html.DisplayNameFor(model => model.LastName) </thursday> <thursday> @Html.DisplayNameFor(model => model.FirstMidName) </th> <th> @Html.DisplayNameFor(model => model.EnrollmentDate) </thursday> <th></thursday> </tr> @foreach (var item in Model) { <tr> <td> @Html.DisplayFor(modelItem => item.LastName) </td> <td> @Html.DisplayFor(modelItem => item.FirstMidName) </td> <td> @Html.DisplayFor(modelItem => particular.EnrollmentDate) </td> <td> @Html.ActionLink("Edit", "Edit", new { id=detail.ID }) | @Html.ActionLink("Details", "Details", new { id=item.ID }) | @Html.ActionLink("Delete", "Delete", new { id=item.ID }) </td> </tr> } -
Printing Ctrl+F5 to run the project. (If y'all get a "Cannot create Shadow Copy" error, close the browser and try once more.)
Click the Students tab to see the test data that the
Seedmethod inserted. Depending on how narrow your browser window is, you'll see the Student tab link in the top accost bar or you'll have to click the upper right corner to run across the link.
View the database
When y'all ran the Students page and the application tried to admission the database, EF discovered that in that location was no database and created i. EF and so ran the seed method to populate the database with data.
Yous tin can use either Server Explorer or SQL Server Object Explorer (SSOX) to view the database in Visual Studio. For this tutorial, you'll use Server Explorer.
-
Close the browser.
-
In Server Explorer, expand Data Connections (you may need to select the refresh push button beginning), expand School Context (ContosoUniversity), and then aggrandize Tables to run into the tables in your new database.
-
Right-click the Pupil table and click Testify Tabular array Information to run into the columns that were created and the rows that were inserted into the table.
-
Shut the Server Explorer connectedness.
The ContosoUniversity1.mdf and .ldf database files are in the %USERPROFILE% folder.
Because y'all're using the DropCreateDatabaseIfModelChanges initializer, y'all could now make a change to the Student class, run the application again, and the database would automatically exist re-created to match your change. For instance, if you add an EmailAddress property to the Student grade, run the Students page once again, and so look at the table again, you lot'll come across a new EmailAddress column.
Conventions
The amount of code you lot had to write in order for Entity Framework to exist able to create a complete database for you is minimal considering of conventions, or assumptions that Entity Framework makes. Some of them have already been noted or were used without your being enlightened of them:
- The pluralized forms of entity course names are used every bit tabular array names.
- Entity property names are used for column names.
- Entity properties that are named
IDor classnameIDare recognized as primary central backdrop. - A property is interpreted as a foreign cardinal property if it'south named <navigation belongings name><main key belongings proper name> (for example,
StudentIDfor theStudentnavigation holding since thePupilentity'south primary cardinal isID). Strange key properties tin can also be named the aforementioned simply <primary key property name> (for example,EnrollmentIDsince theEnrollmententity'south chief central isEnrollmentID).
Y'all've seen that conventions can exist overridden. For instance, you lot specified that table names shouldn't be pluralized, and y'all'll see later how to explicitly mark a belongings every bit a foreign key property.
Go the code
Download Completed Project
Boosted resource
For more than about EF 6, encounter these articles:
-
ASP.NET Data Access - Recommended Resource
-
Code First Conventions
-
Creating a More than Complex Data Model
Adjacent steps
In this tutorial, you:
- Created an MVC web app
- Ready up the site style
- Installed Entity Framework 6
- Created the information model
- Created the database context
- Initialized DB with examination data
- Fix EF 6 to use LocalDB
- Created controller and views
- Viewed the database
Advance to the next article to learn how to review and customize the create, read, update, delete (Grime) lawmaking in your controllers and views.
Source: https://docs.microsoft.com/en-us/aspnet/mvc/overview/getting-started/getting-started-with-ef-using-mvc/creating-an-entity-framework-data-model-for-an-asp-net-mvc-application
0 Response to "Where Are Open Univerity Tutorials Uploaded Where Are Open University Tutorials Uploaded"
Post a Comment